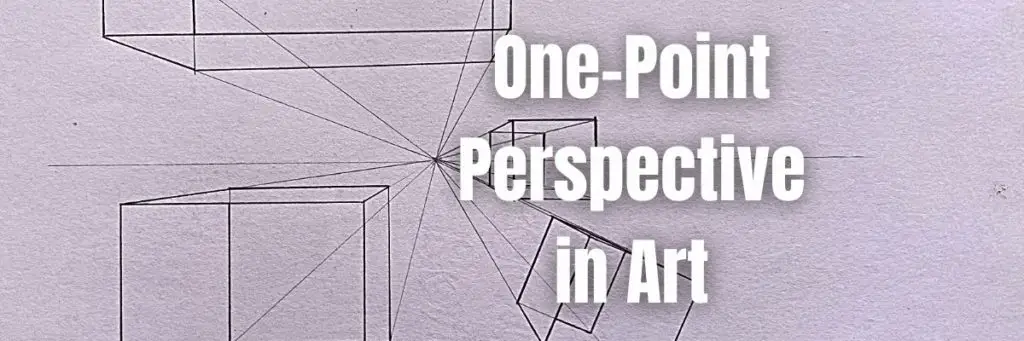
One-point perspective art is a technique that uses one vanishing point on the horizon line. This technique can create depth in art by receding space into the distance and creating an illusion of space, height, distance, or depth.
One-point perspective art has been around for centuries and is used in many different fields, including architecture, painting, and photography.
You see it daily, now and then, without even realizing what you are looking at!
Table of Contents
What is the definition of a One-Point Perspective?
One-Point Perspective is a picture where an object is focused, and its surface faces directly to the eye or camera. When viewing the object, its corners, and parallel lines within the frame or line of sight will converge to a single vanishing point.
It is not as complicated as you read it to be. With some simple tips and tricks, you can create art with a beautiful perspective in no time!
How do you create Step by Step a One Point Perspective Drawing?
There are ten simple steps to follow to create one-point perspective art.
Step One: Draw a Horizon Line
The horizon line is a horizontal line representing the eye level or image inside the camera lens and should be as close to the middle of your paper as possible.
It isn’t necessary for the content to be centered on the page. It can even be positioned outside the boundary. However, to make things easier, let’s place it in the middle.

Step One: Decide on the Location of Your Vanishing Point
When creating a one-point perspective drawing, it’s crucial to determine the vanishing point’s location. While it can be positioned anywhere along the horizon line, it’s typically centered within the picture.

Step Three: Draw Your First Object – A Square
Please draw a square below the Horizon Line, on the bottom left corner, and on the left side of the vanishing point. All of its corners should be facing directly toward the viewer.

Step Four: Draw straight Lines Connecting the Corners of the Square to the Vanishing Point
Next, you will need to draw your baselines. Baselines are the foundation of any perspective drawing and help create the illusion of depth.
Draw straight lines connecting the corners of the square to the Vanishing point. All the parallel lines should get converged to the Vanishing point.

Step Five: Darken the Outline of the Square (Now Box)
Darken the borders of the Square, as shown in the image below. It highlights how a square has turned into a three-dimensional image and shows depth.

Step Six: Draw the Second Object, A Rectangle
Draw the second object a rectangle just above the horizon line, starting from the left side and going beyond the vanishing point on the right side. This object will give how perspective is seen from the bottom up.

Step Seven: Draw the Third Object Square (Different Angle)
The next step is to draw another square from a different angle to see how the object converges at the vanishing point.
Repeat all the processes mentioned in steps 4 and 5 for this object.

Step Eight: Draw the Fourth Object Square
Draw a small square just above the third square you finished now. It would help if you drew it so that the Horizon line should run through it.
All corners should meet at the vanishing point, which will create depth and an illusion of space in art, similar to steps four and step 5.

Once you are happy with your drawing, and if you want to see the objects stand-alone, you can erase any unnecessary lines that may not make sense for this perspective art.
It will give it a more polished look.
To enhance the appearance and dimensionality of your drawing, consider incorporating shadows and textures. This will lend it a more lifelike and breathtaking quality.
To keep it simple, I have not drawn the light and shadows.
That’s all there is to it! With these simple steps, you can create beautiful one-point perspective art quickly!
Ten Rules To Draw One-Point Perspective in Art
Rule 1:
Use only one vanishing point on your horizon line. Anything else would technically be considered multiple points perspective art. We aim to draw artwork with a single-point perspective, so let us stick to it.
Rule 2:
Ensure all parallel lines in your picture lead to that single vanishing point. It will include vertical and horizontal lines and any diagonal lines.
If you have objects not parallel to the horizon line, you can still use one-point perspective art by drawing imaginary lines to connect them to the vanishing point.
Rule 3:
Make sure your picture has a consistent perspective. It means that you should draw all objects in your image proportionate to each other. You can use measuring tools or ratios to help with this, or with the help of Orthogonal lines and practice until you get familiar.
Rule 4:
Make sure your horizon line is straight and not crooked or zigzag. If the horizon could be going through any of your objects, you should re-measure or shift them until they are all level and on a flat surface.
Rule 5:
The Objects will appear smaller and closer as they move towards your horizon line and vanish point. It makes sense because it will seem more miniature than something close if something is further away from you!
The closer an object is to the viewer, the larger it will appear; conversely, things in the distance will be smaller.
Rule 6:
The angle at which parallel lines meet in a one-point perspective drawing or painting determines how tall or long the object is.
The closer the parallel lines are to one another, the taller and skinnier the object will be. If they’re further away, the thing will be shorter and broader.
Rule 7:
Objects farther away from the viewer have more minor details because of foreshortening. On the contrary, things closer to the viewer have larger details.
This is known as foreshortening, when the object is viewed from a position that makes it appear smaller than objects in the background.
Rule 8:
In one-point perspective drawings, curved surfaces do not appear curved. Instead, their sides converge toward vanishing points on the horizon line. This can be difficult to master, but you can create stunning artwork with beautiful perspectives with practice.
Rule 9:
In a one-point perspective drawing, the light source is always to the right or left of you, not above; therefore, objects will cast shadows on their opposite side. Shadows are also drawn shorter than objects due to foreshortening.
It will create more consistent shadows and lighting throughout your picture.
Rule 10:
The color of distant objects in one-point perspective artworks fades to gray or pale colors. The light that might have illuminated them from their front side has faded out as they are further away from us due to atmospheric perspective.
It has nothing to do with a one-point perspective but is still worth mentioning.
A lot goes into creating beautiful art, but these ten rules will give beginners an excellent foundation for success.
Now that you know the basics and the rules, it’s time to try it out for yourself!
One-point perspective art is a great way to add depth and realism to your art, so don’t be afraid to try it!
Start by drawing a simple one-point perspective picture with just a few objects. As you get more comfortable with the rules, you can include more details and create a more complex perspective picture of a house or other object.
Once you get the hang of it, you can start branching out and experimenting with different things and scenes.
When should one use a One-Point Perspective?
One-Point Perspective is used when the object is in front of your eyes or camera and has a single vanishing point. It is also used when an artist wants an art piece to depict a linear perspective.
A one-Point Perspective is not used when multiple vanishing points views are split into more than one vanishing point.
Conclusion:
We hope that our post has aided in your comprehension of the principles and rules governing the one-point perspective technique in the drawing. We encourage you to try your hand at it and see what you can come up with!
If you’re feeling confident after reading this post, please share it on social media, or please feel free to comment.
Happy drawing.
Comments are closed.